set(TENSORFLOW_INCLUDES ${PROJECT_SOURCE_DIR}/lib/tensorflow ${PROJECT_SOURCE_DIR}/lib/tensorflow/include ${PROJECT_SOURCE_DIR}/lib/tensorflow/third_party/proto ${PROJECT_SOURCE_DIR}/lib/tensorflow/third_party/protobuf-host/include ${PROJECT_SOURCE_DIR}/lib/tensorflow/third_party/eigen ${PROJECT_SOURCE_DIR}/lib/tensorflow/third_party/nsync/public ${PROJECT_SOURCE_DIR}/lib/tensorflow/third_party/absl ) set(TENSORFLOW_LIBS ${PROJECT_SOURCE_DIR}/lib/tensorflow/lib/libtensorflow-core.a ${PROJECT_SOURCE_DIR}/lib/tensorflow/third_party/protobuf-host/lib/libprotobuf.a ${PROJECT_SOURCE_DIR}/lib/tensorflow/third_party/nsync/builds/default.linux.c++11/nsync.a pthread m z dl )
...
If
undefined reference to tensorflow::Status::ToString() const
issue arise, try to build you project with
-D_GLIBCXX_USE_CXX11_ABI=0 which will force GCC to use the
old ABI version or try to use
-D_GLIBCXX_USE_CXX11_ABI=1.
This static library will not contain: * Python or
other language bindings * GPU support
Open the file in Microsoft Excel and ensure that the spreadsheet file
is writable and macros are enabled1.
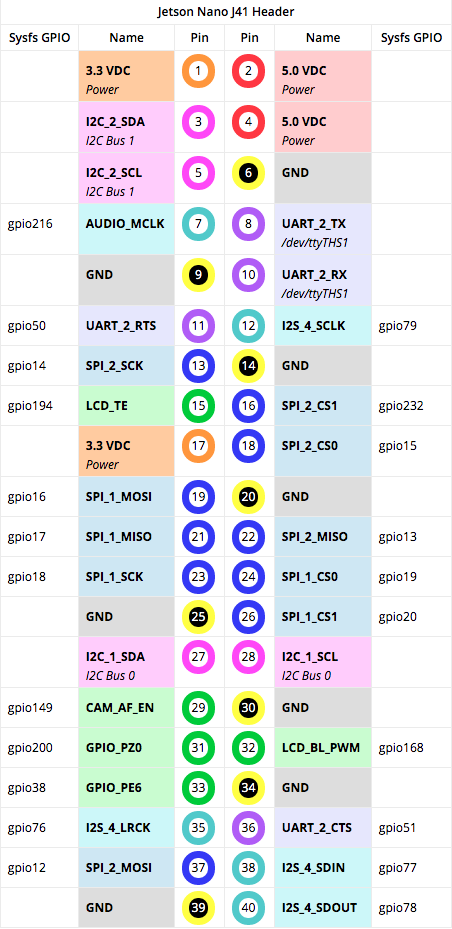
Change the Customer Usage of pin GPIO13(33, GPIO_PE6) to PM3_PWM2 and
the pin direction to Output.
Jetson nano 40pin
Click the Generate DT file button to export your pinmux
configuration. When prompted, enter the board name jetson-nano-sd. The
spreadsheet creates two device tree source files
tegra210-jetson_nano-sd-gpio-default.dtsi and
tegra210-jetson_nano-sd-pinmux.dtsi.
Under the File menu in Excel, select Save As, enter the filename
jetson-nano-sd.csv, select CSV UTF-8 (comma-delimited)
(*.csv) from the menu of filetypes, click Save
Go to the directory Linux_for_Tegra and run the script source_sync.sh
to download the various source trees. When prompted, enter the correct
tag for the L4T version you are using. The release tag name can be found
in the L4T Release Notes. For example, for L4T release 32.1, enter the
tag tegra-l4t-r32.1.
You can use Jetson
stats to find the L4T Release Notes.
Click “Select image” and choose the zipped image file downloaded
earlier.
Insert your microSD card(Click Ignore if your Mac shows
windows).
If you have no other external drives attached, Etcher will
automatically select the microSD card as target device. Otherwise, click
“Select drive” and choose the correct device.
Click “Flash!” Your computer may prompt for your username and
password before it allows Etcher to proceed. It will take Etcher about
10 minutes to write and validate the image if your microSD card is
connected via USB3.
After Etcher finishes(your Mac may let you know it doesn’t know how
to read the SD Card), just click Eject and remove the microSD card.
风扇控制
1
sudo sh -c 'echo 30 > /sys/devices/pwm-fan/target_pwm'
SWAP
Since memory (4GB) on the Jetson Nano is rather limited, I’d create
and mount a swap file on the system3. I referenced Create a
Linux swap file for that. And I made a 8GB swap file on my Jetson Nano
DevKit.
nvcc: NVIDIA (R) Cuda compiler driver Copyright (c) 2005-2018 NVIDIA Corporation Built on Sun_Sep_30_21:09:22_CDT_2018 Cuda compilation tools, release 10.0, V10.0.166
deb http://mirrors.tuna.tsinghua.edu.cn/ubuntu-ports/ bionic main multiverse restricted universe
deb http://mirrors.tuna.tsinghua.edu.cn/ubuntu-ports/ bionic-security main multiverse restricted universe
deb http://mirrors.tuna.tsinghua.edu.cn/ubuntu-ports/ bionic-updates main multiverse restricted universe
deb http://mirrors.tuna.tsinghua.edu.cn/ubuntu-ports/ bionic-backports main multiverse restricted universe
deb-src http://mirrors.tuna.tsinghua.edu.cn/ubuntu-ports/ bionic main multiverse restricted universe
deb-src http://mirrors.tuna.tsinghua.edu.cn/ubuntu-ports/ bionic-security main multiverse restricted universe
deb-src http://mirrors.tuna.tsinghua.edu.cn/ubuntu-ports/ bionic-updates main multiverse restricted universe
deb-src http://mirrors.tuna.tsinghua.edu.cn/ubuntu-ports/ bionic-backports main multiverse restricted universe
为了解决OpenCV3.4.2与CUDA10.0的冲突,下载NVIDIA VIDEO
CODEC
SDK,复制Video_Codec_SDK/include/下的nvcuvid.h和cuviddec.h到/usr/local/cuda/include/,修改opencv/modules/cudacodec/src/下的precomp.hpp,cuvid_video_source.hpp,frame_queue.hpp,video_parser.hpp,video_decoder.hpp:
# Create a new virtual environment by choosing a Python interpreter and making a ./venv directory to hold it: virtualenv --system-site-packages -p python3 ./deeplearning
# Activate the virtual environment using a shell-specific command: source ./deeplearning/bin/activate
WARNING: ignoring LD_PRELOAD in environment.
WARNING: --batch mode is deprecated. Please instead explicitly shut down your Bazel server using the command "bazel shutdown".
You have bazel 0.18.0- (@non-git) installed.
Please specify the location of python. [Default is /usr/bin/python]: /usr/bin/python3


Found possible Python library paths:
  /home/hanjie/Software/caffe/python
  /usr/lib/python3.6/dist-packages
  /usr/lib/python3/dist-packages
  /usr/local/lib/python3.6/dist-packages
Please input the desired Python library path to use.  Default is [/home/hanjie/Software/caffe/python]
/usr/lib/python3/dist-packages
Do you wish to build TensorFlow with XLA JIT support? [Y/n]: n
No XLA JIT support will be enabled for TensorFlow.

Do you wish to build TensorFlow with OpenCL SYCL support? [y/N]: n
No OpenCL SYCL support will be enabled for TensorFlow.

Do you wish to build TensorFlow with ROCm support? [y/N]: n
No ROCm support will be enabled for TensorFlow.

Do you wish to build TensorFlow with CUDA support? [y/N]: y
CUDA support will be enabled for TensorFlow.

Please specify the CUDA SDK version you want to use. [Leave empty to default to CUDA 9.0]: 10.0


Please specify the location where CUDA 10.0 toolkit is installed. Refer to README.md for more details. [Default is /usr/local/cuda]:


Please specify the cuDNN version you want to use. [Leave empty to default to cuDNN 7]: 7.3.1


Please specify the location where cuDNN 7 library is installed. Refer to README.md for more details. [Default is /usr/local/cuda]: /usr/lib/aarch64-linux-gnu


Do you wish to build TensorFlow with TensorRT support? [y/N]: y
TensorRT support will be enabled for TensorFlow.

Please specify the location where TensorRT is installed. [Default is /usr/lib/aarch64-linux-gnu]:/usr/src/tensorrt


Please specify the NCCL version you want to use. If NCCL 2.2 is not installed, then you can use version 1.3 that can be fetched automatically but it may have worse performance with multiple GPUs. [Default is 2.2]: 1.3


Please specify a list of comma-separated Cuda compute capabilities you want to build with.
You can find the compute capability of your device at: https://developer.nvidia.com/cuda-gpus.
Please note that each additional compute capability significantly increases your build time and binary size. [Default is: 3.5,7.0]: 5.3


Do you want to use clang as CUDA compiler? [y/N]: n
nvcc will be used as CUDA compiler.

Please specify which gcc should be used by nvcc as the host compiler. [Default is /usr/bin/gcc]:


Do you wish to build TensorFlow with MPI support? [y/N]: n
No MPI support will be enabled for TensorFlow.

Please specify optimization flags to use during compilation when bazel option "--config=opt" is specified [Default is -march=native]:


Would you like to interactively configure ./WORKSPACE for Android builds? [y/N]: n
Not configuring the WORKSPACE for Android builds.

Preconfigured Bazel build configs. You can use any of the below by adding "--config=<>" to your build command. See tools/bazel.rc for more details.
	--config=mkl         	# Build with MKL support.
	--config=monolithic  	# Config for mostly static monolithic build.
	--config=gdr         	# Build with GDR support.
	--config=verbs       	# Build with libverbs support.
	--config=ngraph      	# Build with Intel nGraph support.
Preconfigured Bazel build configs to DISABLE default on features:
	--config=noaws       	# Disable AWS S3 filesystem support.
	--config=nogcp       	# Disable GCP support.
	--config=nohdfs      	# Disable HDFS support.
	--config=noignite    	# Disable Apacha Ignite support.
	--config=nokafka     	# Disable Apache Kafka support.
Configuration finished
The ZED SDK installer gives you the possibility to set the Jetson in
maximum performance mode. This makes sure the Jetson is ready to run the
ZED SDK and your programs at the maximum of its capabilities8.